Contents
- Before you begin
- What you’ll set up
- 1. Create and configure the portals
- 2. Prepare courses and events to appear in the portal
- 3. Configure the booking workflow for requests
- 4. Set up automated communications
- 5. Test the request experience end-to-end
- 6. Enable and process cancellation requests
An Approval Portal lets learners request registration for upcoming training events, while your admin team reviews and either approves or rejects those requests based on your rules, such as capacity, role or rank, prerequisites, and other internal criteria.
This setup gives you:
- Learners who can browse your catalog and submit event requests through a guided portal experience
- Administrators who can review requests and decide whether to approve or reject them before a registration is created
Before you begin
- You will typically set up an Approval Portal with help from your Customer Success Manager or Administrate Support.
- Approval Portals rely on portal configuration plus booking workflow steps and transitions that support approval and rejection processing.
- Before testing with learners, make sure your portal configuration, course/event visibility, booking workflow, and communications are all in place.
What you’ll set up
- Create and configure the portals
- Prepare courses and events to appear in the portal
- Configure the booking workflow for requests
- Set up automated communications
- Test the request experience end-to-end
- Enable and process cancellation requests
1. Create and configure the portals
You’ll set up a Student Portal for learner access, and a linked WebLink Portal so learners can browse your catalog and submit event requests. Approval Portal behavior depends on both the learner-facing portal experience and the configuration behind it.
Recommended setup order
- Set your approval portal brand
- Create your Student Portal
- Create a WebLink Portal linked to the Student Portal so learners can browse your course and event catalog
- Apply the Approval Portal configuration using your implementation tooling, typically GraphQL. This includes:
- Marking the portal as an Approval Portal
- Setting the region and currency rules that control which events appear
- Defining which course categories appear in the portal catalog
Once the portals are configured, you can prepare the course and event content that learners will see and request.
2. Prepare courses and events to appear in the portal
To display content in the Approval Portal, make sure your course templates and events align with the category, region, and currency rules defined for the portal.
- Open Course Templates.
- Select any course template you want learners to browse in the Approval Portal.
- Assign that course template to the category or categories you configured for the portal catalog.
- Create or confirm the events you want learners to be able to request.
- For each event that should appear in the portal, make sure:
- The event location matches the portal’s region
- The event pricing matches the portal’s currency
Once the content is mapped correctly, you can configure the booking workflow that receives and processes training requests.
3. Configure the booking workflow for requests
Approval Portals depend on a booking workflow that can receive incoming requests, route them for review, and then either approve or reject them. This is the operational core of the Approval Portal.
Workflow structure
- Navigate to Booking Layout in the Control Panel.
- Create a new attribute called Rejected Reason so your team can record why a request was not approved.
- Navigate to Bookings Workflow in the Control Panel.
- In the Stages tab, create a new stage called Requested with an Open status. This is where incoming requests will land.
- Open the Steps tab.
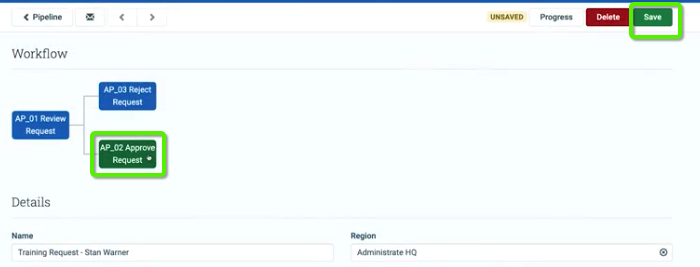
- Create the request-processing steps your team will use:
-
Review Request
- Use an Open status
- Add the Rejected Reason attribute so it is available to administrators during review
-
Approve Request
- Use a Won status
-
Reject Request
- Use a Lost status
- Add the Rejected Reason attribute here as well
- It often makes sense to require this field so every rejection records a clear reason
-
Review Request
Your request-processing steps should look similar to the following:

Transitions
- Open the Transitions tab and create the transitions that move a request through review:
- Request Received moves the request from your API order or portal-originated entry point into Review Request
- Request Approved moves the request from review to approval and includes the logic to Create Registration, which actually enrolls the learner on the event
- Request Rejected moves the request from review to rejection and should require completion of Rejected Reason
Your transitions should look similar to the following:

- Open the Entry and Follow Ons tab.
- Set your Review Request step as the entry step. This ensures new sales bookings and request-originated bookings land in the correct review flow.
Your Entry and Follow Ons setup should look similar to the following:

- Open the Settings tab.
- Set the Lead Entry Step for API Orders to your request-routing step so that requests coming from the portal are routed into review. In many cases this will pass the request through to Review Request.
Your Settings tab should look similar to the following:

At this point, your booking workflow contains the logic required for staff to receive, review, approve, and reject requests. The next step is to make sure learners are informed throughout that journey.
4. Set up automated communications
An important part of Approval Portal functionality is messaging. Learners should always know whether their request has been received, approved, rejected, or later canceled.
Recommended messages
- Request received to confirm the learner’s request has been submitted and is being reviewed
- Request approved to confirm the learner has been accepted and registered
- Request rejected to confirm the learner’s request was not approved
Recommended trigger setup
- Create three communication templates:
- Request received
- Request approved
- Request rejected
- Create three communication triggers.
- For all three triggers, use:
- Target: Booking
- Trigger type: Booking Transition
- Audience type: Contact
- Associate each trigger to the correct transition:
- Request received fires when a request transitions into Review Request
- Request approved fires when a request transitions from Review Request to Approve Request
- Request rejected fires when a request transitions from Review Request to Reject Request
- Save the triggers and then return to the Booking Workflow to confirm the communications appear on the related transitions.
- Before going live, create manual test bookings and confirm:
- Your team can transition bookings through every required step
- The correct emails are sent at each point in the process
This validation step matters. It is much easier to correct workflow or trigger errors before learners begin submitting real requests.
5. Test the request experience end-to-end
Before inviting learners into the portal, test both the learner journey and the administrator journey to confirm the full workflow behaves as expected.
Learner test
- Access the portal as a test learner. If needed, manually create credentials from the contact record using the Set Up Account dialog, select the correct approval portal brand, and send yourself a password setup email.

Note: Give thought to how learners will first gain access to the Approval Portal. A common pattern is to create a welcome event that includes an On Registration trigger tied to a communication template containing an LMS setup link. That event can include a simple instruction guide or video that introduces learners to the request workflow.
- Log in as a learner and confirm the homepage includes the expected approval portal elements.

- Confirm the Catalog icon takes learners to the available course catalog.
- Confirm the My Requests icon takes learners to their request history.
- Open the catalog.
- Open the Categories dropdown and verify the categories mapped to the portal appear as expected.

- Open a course card and confirm available events appear with a Request action.

- Select an event and click the request button.
- Click Complete Booking to submit the request.

- Confirm the request now appears in My Requests with an Awaiting Approval status.
- Confirm the learner receives the Request received email.

Admin test
- In the TMS, confirm a booking was created for the learner’s request.
- Sort bookings newest to oldest if needed, and confirm the request is in the Review Request step.
- Advance the booking to Approve Request.
- Verify the learner is now registered on the event.
- Confirm the learner receives the Request approved email.
- Return to the portal and confirm the request now shows Approved.

- Repeat the process with a second request, but this time transition it to Reject Request.
- Confirm Rejected Reason is captured if required.
- Confirm the learner receives the Request rejected email.
- Return to the portal and verify the request shows a rejected status.
Once this test passes, you should feel confident the Approval Portal is working properly for both learners and administrators.
You should also create an internal processing routine for your staff, which may be as simple as assigning someone to review bookings sitting in the Review Request step on a regular schedule.
6. Enable and process cancellation requests
Approval Portals can also support learner-initiated cancellation requests for events they are already registered on. This creates a second managed workflow where learners request cancellation and administrators approve or reject that request.
Learner cancellation request
- Log in to the Student Portal and open My Courses.
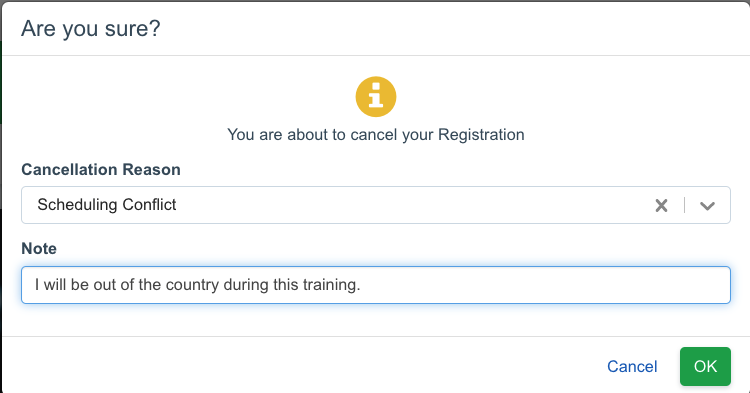
- Click Cancel Registration.

- Select a Cancellation Reason.

Note: Cancellation reason options are typically populated during portal setup using implementation tooling such as GraphQL, and should be defined when the portal is first configured.
- Add notes if needed and click OK.
- Confirm the request appears in My Requests > Cancellation Requests.

Admin processing
- In the TMS, open Events.
- Open Manage Cancellation Requests.

- Review the request in the Awaiting Approval queue.
- Use the action menu for the request you want to process.
- Choose either Approve request or Reject request.


- If you want to notify the learner directly from this action, check Send email to Learner and complete the message details.
- Complete the action.
- Return to the portal and confirm the cancellation request now shows the correct processed status.


At this point, you should have a working Approval Portal experience for both event requests and cancellation requests, with clear operational steps for learners and administrators.